
Ken Glover's photo from the Canadian classic, Deltaform.
Colin Haley said it well, "it's 2000 year old technology...amazing how pack manufactures can still screw it up". That was just before him showing his audience for the evening two really basic alpine climbing packs that were prototypes he was using and happy with from one of his sponsors, Patagonia.
Those same packs that could just as easily be copies of the original Wild Things or later CCW packs. Or the Karrimore Brown, Whillians or Haston sacs bitd. See a theme there?

"Colin Haley photo of Bjørn-Eivind Årtun unroped onthe Cassin, June ."
It doesn't take a large pack toalpine climb in. Most have figured it out thatsomewhere between 18L and 35L is about all they want toclimb seriously inanyway.
Nothing has really changed. Some are going bigger today and mostare climbing faster and lighter because of the new technology.

John Bouchard..who had more imagination and an idea of where we would be going that almost anyone else in NA at the time.
In 1981 John Bouchard and Marie Meunier started Wild Things. New to most Americans,the "light is right" ideawas already well entrenched by those climbing hard things in the Alpine. Guys like Bouchard pretty much had the idea written in stone for themselves. Generally back then everyone sewed their own stuff (swamis, packs and clothing) to some extent. Wild Things was one of the first to sew up stuff guys were trying to make on their own.
It was a big deal in 1981.
Not that well known but Wild Things supported and influenced and entire generation of serious alpine climbers, Bill Belcourt (now at Black Dianmond), Randy Radcliff (now at Cold Cold World) and Mark Twight (where is he these days?)all got started in the retail/whole sale business to some extent and stayed a while at Wild Things. It was the "tin shed" of alpine climbing on the East Coast (most of NA actually) with Bouchard instead of Chouinard at the helm and a good step higher in technical alpine climbing. Bouchard maybe with even more impact on what we do and see today in gear than Chouinard has.Micheal Kennedy, Mark Richey, Mugs Stump were all big Wild Things gear fans. Most were.

Mugs Stump had that same imagination pushed the idea even further by his own climbs.
Wild Thingsgear was a natural progression of what Lowe Alpine Systems, Don Jensen and Sacs Millet started before them.
You either got it or you didn't, then and now. The gear was exceptional for a certain use. If you weren't using it for that, it likely sucked for your use. Many of those original designs were the first look at very specialised climbing gear...clothing and packs.

Pays to remember that Mugs and Paul went over the 'shrund on Moon Flower with one Wild Things Andinista. It was in part their climbing sac, haul bag, bivy sac and hammock. Today guys do it in day packs. But they wouldn't be able to do that today if a few weren't always pushing the limits on gear and technique before them.
And several generations later. And here is a Cold Cold World pack..still sewn one at a time by Randy Rackliff. You are looking at 40+ years of experience and technology here.
Few designers have so much experience in the use and application of their own designs. Chouinard, Todd Bibler, John Bouchard, Don Jensen come to mind. My point is there aren't many in the same category. None making climbing packs. When cutting edge practioniers are directly involved in design and manufacture it makes a difference.
Rackliff's alpine climbing resume is worth a look. Findingout what he has done is a little harder. Among hisclimbs are earlysolo ascents of Slipstream andPolar Circus,a complete ascent ofMoonflower Buttress, and the obvious and unrepeated Reality Bath.
A video and more here:
http://www.marktwight.com/videos.php?id=2
When I wanted to replace my small (30L) climbing pack I looked around, bought a few production packs and one "custom". One of the production packs I have kept but the others I returned in short order including the spiffy "custom". Obvious the makers had no idea what the intended use was to be for a "climbing sac".

A little heavy and too expensive, but one I keptand really like, but now use only as a ski pack, the Arcteryx Khazi 35.
Back to Colin Haley's original comment, ""it's 2000 year old technology...amazing how pack manufactures can still screw it up".
For most every climb I have done that didn't require a sleeping bag I've useda pretty basic but actually very complicated pack.

*1973*
So when I went to replace that pack it quickly became obvious I'd want someone building them that was of a like mind set. The pack I was looking for wasn't full of flash, hype or excuses just the basics done extremely well.


Custom red Ozones in **


I like the option of a removable lid as I seldom use one climbing.


Custom Ozone made from White Widow Spectra Ripstop.

Turns out Randy Rackliff at CCW was already making what I wanted and was willing to make it even better for my own needs with little extra cost. Although I suspect it was more labor than I imagined, he has been more than happy to oblige when I ask. No excuses, no argument, just helpful suggestions and a quick delivery time. With one more even smallerclimbing pack in the worksnowat CCW, my long term climbing pack requirements are covered.
Specs off the Spectra Ripstop Ozone:
Cost $130.
Pack weighs in at less than 1.5 #. Material is Spectra ripstop. Shoulder harness is off a full size CCW pack for the extra padding required on heavier loads. Some where above a 35L in my 21" back size.
custom sizing
custom pattern originally based on the Ozone size
2 liter+ top pocket
2nd zippered pocket in lid with key holder
Zippers reversed for use on hanging belays
pull down shoulder straps
main bag guide book zippered pocket
coveredlid buckle
removable foam pad
oversize shoulder straps
Perlon haul loop
dbl strap patches on lid
dbl rope straps
dbl bottom
10" extension
lid is extendable or removable
bar tacked daisy chain on the bottom of the lid strap
Another project from CCW that I am pleased with is a big sack. Something I don't use often these days but when required a big sack needs every bit of the attention to details as a smaller more sophisticated climbing sac does.

No surprise I suspect that I base my needs on the Wild Things' original Andinista. I used one a lot over the years both guiding and my own trips to the greater ranges.

Wild Things took the large pack idea way beyond anyone before them. The Andinista was a pack you could lug huge loads of gear to base campwith, then zip it downand strip the lid and use it as a summit pack. Wild Things and CCW were also the some of first to use Dyneema® in pack production.More than one pack sewn at CCW that went out with a big name manufactures label sewn on for the brand name, sponsored climber. Saying it, doesn't make it a reality.
From the Wild Things web page:


I went looking for a new larger volume climbing sack. Of course anything I wanted would have to be sewed up to my size and a special order. I have lots of packs but the only company I own several of and continue to use every where, is the CCW stuff.
Built mainly from a black "spider web" Spectra rip stop, Choas in size, leashless tool attach and crampon bag included.
Worth noting CCW retails (and still amazing to me) are less for a totally custom pack than others are for a production pack.
Totally custom pack to my specs, with select materials, harness and accessories with the Chaos' volume. $245 and $10 shipping from the East coast to Issaqauh WA. And amazingly, a week after the order was placed it was shipped out to me. Freak'in stellar customer service!
Not the best know fact...but certainly no surprise if you know their back grounds,Twight, Belcourt, House and dozens of others have used "COLD COLD WORLD" packs off and on for years.
The one shown is a size Large with a 19.5 back.
Postal scale says 2# 4oz stripped (lid and foam off)
Tri folded 9mm Foam 3 or 4 oz (3/4 size and 22"x37")
mongo size lidanother 8 oz
Just under 3# all added up and 4000+ cu in. for a size large. Extension is at least another 1500ci. 4000 in³ = 65.5482 L
Big enough to be used as a half bag if required and strong enough to stand in while hanging on the haul loops. Material is 500 denier nylon with a Spectra carbon fiber ripstop reinforcement woven into the fabric. The pack could be made lighter using lighter weight materials and triple the cost. I was looking for something lwt weight, would look good in photos and tough enough to last a decade or so, all without dropping a gazzillion $.
CCW's even sewn up a few "white" ones you've seen in the Patagonia catalog that another company just loves to take credit for :-) Imagine their customer service with that as a base line.
If you are looking for something really special for your own climbing you should make the effort to discuss your project with Randy @ CCW 603 383 9021 http://www.coldcoldworldpacks.com/
FWIW I have happily paid full retail (which is generally way less than anyone's normal retail ) for every CCW I own. This blog postis about as good as a personalendorsement as I'll evergive a piece of kit or a manufacture. No one even in the same ball gameas CCW for design and customer service building climbingpacks these days. When you are that good no incentive to brag about it.
 [image from Velo-Orange]
 [image from Velo-Orange]
 Each of us had a pre-dinner gift, the Christmas Cracker (actually an English tradition and quite commonly practiced as well in the commonwealth countries, i.e. Canada, South Africa, New Zealand and Australia) which contained some trivias and a paper crown in different colours that we all wore throughout the evening. I had a pink crown.
 Left to right: Table setting; Salmon Tartare; Goat cheese with pecan nuts; Braised pork (I think) with beets and boiled potato topped with white sauce; Spinach salad with boiled white eggs, raisins, tomato and pine nuts in honey-mustard-balsamico dressing; Chickory salad with apple, walnuts, radish, onions, celery in honey-mustard-cheese dressing; Tiramisu; Creme Brulee with cranberies and blueberries; and Christmas chocolates to go with the coffee.
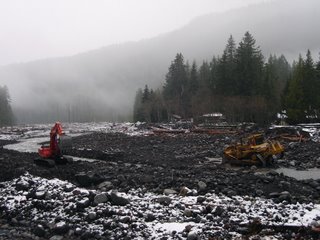 The road to Mt Rainier National Park's recovery is passing through some interesting terrain. Today, I saw a large bulldozer working in the Nisqually River. One of the vexing problems for the NPS is that rivers and streams have jumped their main channels. During a storm, riverbeds can become filled with debris, which in turn causes the river's flow to change its course. To some extent, that is why the
 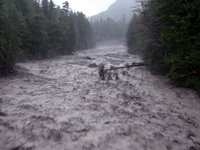 The historian in me wanted to capture a during and after view of the Nisqually River. Here is the "during" image from Monday afternoon, Nov. 6th when things really started to roll. This picture is taken from the Longmire bridge looking upstream.
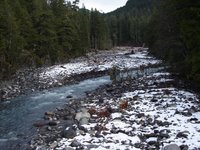
 Lately I've been testing and experimenting with many bikes, and some have asked which ones I ride on a regular basis. Or do I ride a different one every day? Well, definitely not that. Despite a penchant for accumulating temporary and permanent bicycles, I prefer to ride the same ones over and over, and the fewer the better. The rotation changes, but the pattern has been three bikes at a time. Now that it's the hottest part of the summer, I've been riding the mixte for transportation, as well as a roadbike and a touring bike for sporty rides. As the cold season approaches I will start riding the mixte less and my hardy 3-speeds more. For roadcycling I will probably switch to a fixed gear as the days grow shorter, because it packs more punch into shorter rides. But all in all, it's pretty much no more than three bikes at a time for me, one of which is always a fully equipped transportation bike.


 Enough people have asked me about this now that I thought it worth writing about: How do I put a toe down in traffic while remaining on the saddle, and also manage to get full leg extension on the downstroke? I will try to explain.
 First off, let me clarify that I get "more or less" full leg extension, and obviously my leg would be even straighter if I had the saddle higher. So there is a bit of give and take to it. But the idea that your leg needs to be arrow-straight on the downstroke with the toe on the pedal and the heel raised, is not one that everyone subscribes to - especially not cyclists in cities where riding a bike for transportation is common. In Vienna, I would say that about half the cyclists I saw had their saddles adjusted so that they could touch the ground with a toe. Based on the pictures here, this seems to be the case in Copenhagen as well. When riding in cities with frequent intersections and stop signs, it can be tedious to get on and off the bike every 3 minutes. Being able to put a toe down makes things easier.
 Another point, is that some bicycles' geometries work better for this than others: Typically, Dutch-style city bicycles have very relaxed seat tube angles, which increases the distance between the saddle and the pedals while keeping the saddle height constant. A lower bottom bracket helps as well, though not as much as a slack seat tube. You can watch this video of Dottie starting and stopping on her bike to get a better idea of how this works on a Dutch bike.
 Finally, this may not be sufficiently noticeable in pictures, but I lean my bike to the side in order to reach the ground with a toe. I also keep my other foot on the pedal for balance. I cannot reach the ground with both toes, and I cannot even really reach with one toe unless I lean. This is something that becomes instinctive if you do it often enough. Alternatively, you could set the saddle lower. I've basically raised mine as far as I possibly can, while still managing to reach with one tip-toe while leaning.